iPad
Mobile iPad Lab on the Cheap: DYI Charging Cart
Sep 22, 2012 Filed in: Technology Integration
Things being what they are… just isn’t always enough money to do things the “Professional, High Quality” way we would like.
Our district is in the throws of “Racing to the Top” and at the same time we are still under severe budget constrictions. Every technology dollar budgeted is directed towards ‘Testing Computers’. Meanwhile, my dream and educational vision is to increase student use of the technology for problem solving, creativity, communication, collaboration, and amplifying their understanding. The challenge is doing more with less.
I fundraised, scrimped, saved and advocated for the purchase of a ‘Class Set of iPads’ at my school and even though the iPads themselves are about half the cost of laptops or desktop computers, there are still those additional costs for a full set of apps, protective covers, and then the big one: a charging cart for moving the iPad lab from classroom to classroom. The Bretford Charging Cart is really nice, sturdy, secure. A worthy mode of transporting and charging those wonderful iPads. But when you are starting with nothing and penny pinching, that cart is about the equivalent of 5 iPads.
So the next choice was a rolling file cart. I was pleased to find that this particular cart would accommodate nearly 40 iPads in two rows with the charging dock facing up. Here is a step by step to help you build your own iPad Rolling Classroom Lab!
–note that this set of instructions is for a lab that charges, but doesn’t provide the hardware for wired syncing
1) Purchase Vaultz Locking Mobile Wheelie Chest. This link is available for your convenience, but I have seen these at Staples, and Office Depot.
2) Test for iPad Capacity.
Of course, before you start to modify or invest in other parts for this project, it would be good to check and see if your iPads will fit as nicely as mine did. I didn’t purchase an iPad case that added substantial thickness or width to the overall size of each iPad. So try your iPads and see if you will be able to accommodate as many as you need. Ultimately the finished project will position the iPads over the wheels and leave room for the chargers in the front of the box as seen here above left.
Remember, you want to be able to charge these in the cart, so there should be room above the iPad for the charging cables without undo stress.
4) Build your Charging Station. Buy 6 USB 4 Port Chargers (for 24 iPads).
I wrestled for a while with finding powerstrips that would allow 6 or 8 Apple iPad Chargers to sit side by side on one powerstrip. I would think that there is something like this out there, but as I was working through this, I realized that it would be hard to fit three of these powerstrips, with their cables and the iPad chargers into the space I was saving for this. So then I begin looking for third party USB charging stations. None of what I found provide the full amperage that a single Apple iPad charger provides, but the one I selected Provides standard USB 5V at up to 2A (max). From experience, this meant that if four iPads were plugged in to one of these, it would take approximately four times as long to charge as if I used the Apple Charger. If school ended at 4 PM and started at 9 AM the following day, there would be more than enough time to get a full charge restored to the iPads (17 hours). I have heard that the new iPad takes a bit longer to charge than iPad 2 and iPad 1. Some background information from––> Gizmodo.
5) You may need to grind down the charger AC adapter.
I found that I needed to remove some of the plastic wings that were apart of the aesthetic design of the chargers.
These wings may also serve to stabilize the charger on the wall or powerstrip, but once my chargers were attached to the powerstrip, that would not be an issue, since they would be so close side by side, they would stabilize each other.
Your powerstrip may not require you to cut these off.
I had access to a grinder, but you may need to use a vice with a sander to do the same job. Careful of the hot plastic, it burns!
6) Assemble the Chargers.
I initially want to have capacity for 24 iPads in my cart. The power strip I chose had 5 outlets, so I put four of the 4 Port USB chargers on that block, then I added a three outlet extension cord to the 5th outlet on the powerstrip. Eventually I could have 28 iPads charging in this cart: (7) 4 Port USB charging blocks.
The 4 port USB Charging Blocks have the option of removing the AC adapter built in and using a Figure 8 AC Adapter cord similar to what is found on VCRs and other household electronics.
7) Hide the Wire Mess Part 1
As I mentioned before, as an educational technologist, wires are necessary, but I often get overwhelmed and frustrated dealing with the spaghetti that is the bane of my existence. I wanted to keep this neat and easy to use for my teachers and students. The next step was to cut a piece of 3/8” plywood so that it fit in and formed a wall between the charging chamber and the iPad chamber.
The plywood fits down below the metal rail that the top of the cart rests in.
I also cut and used wood glue to adhere a 1” X 1” to the bottom of my chamber wall. This will help reinforce (keep from bowing) and stabilize the wall. I will also put velcro on the bottom of it, to help keep the wall in place.
8) Hide the Wire Mess Part 2
Next comes the cover to hide the wires, powerstrip and USB Charging Blocks. Using leftover scrap from the 3/8” plywood, I cut notches in it to pass the USB charging cables through. The slits don’t have to be exact in size or depth, just relatively evenly spread apart. I made enough for 7 charging blocks in case I get as many as (4x7) 28 iPads to populate this case.
I found that a sharp razor knife was the easiest way to cut black felt to cover the two pieces of plywood. You could hot glue the felt, but I found it fast and easy to use a staple gun. I then used scissors to cut slits where the cords would slide through.
Note: It is amazing how nice jury rigged things look once you cover them in black felt.
9) Neatening Everything Up
I started to use wire twist ties to group the four wires so they would not be randomly going everywhere, then I decided to use nylon ties. The nylon ties were much tighter, and provided a cleaner look. I only want enough of the cables to stick through as necessary to reach the iPads.
I used a few more small strips of velcro to hold the top to the side of the divider plywood. Even though the velcro had a pretty strong adhesive, I used the staple gun to secure the felt and velcro to the plywood. Everything was wedged pretty tight so that probably wasn’t necessary, but kind of helped seal things up.
10) Cushion for the Bumpy Sidewalk
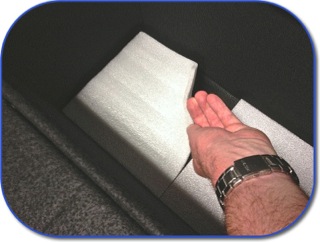
Our school is an outdoor school with rather old sidewalks between wings, so I put a couple of sheets of foam under the iPads to provide a little additional cushioning. It probably was not really necessary, but it didn’t cost me anything extra, so why not?
11) Last Step: Velcro the Power Strip Cable
The last thing I did was use a small wood screw to fasten a velcro wrap to the side of the case so that during transport the Power Strip Cable was not dragging around on the ground.
Shopping List (not all items are mandatory)
Vaultz Locking Mobile Wheelie Chest
Two scraps of 3/8” plywood
5 port surge supressor powerstrip
6 Cosmos 4-Port Wall USB Chargers
~24 Small Nylon Ties
24 USB –>iPad Dock Cables
Small Piece of Black Felt (less than a square yard)
Short Extension Cord with three plugs at the end
Figure 8 electrical AC Adapter cord
Foam packing layer
Tools
Scissors
Hole Saw
Razor Knife
Staple Gun
Table, Band, or Circular Saw to cut wood
Sander or Grinder to modify the USB chargers if necessary
I would love to hear from you if you have any comments, corrections, or suggestions. Leave your comments below or send me an email!
Our district is in the throws of “Racing to the Top” and at the same time we are still under severe budget constrictions. Every technology dollar budgeted is directed towards ‘Testing Computers’. Meanwhile, my dream and educational vision is to increase student use of the technology for problem solving, creativity, communication, collaboration, and amplifying their understanding. The challenge is doing more with less.
I fundraised, scrimped, saved and advocated for the purchase of a ‘Class Set of iPads’ at my school and even though the iPads themselves are about half the cost of laptops or desktop computers, there are still those additional costs for a full set of apps, protective covers, and then the big one: a charging cart for moving the iPad lab from classroom to classroom. The Bretford Charging Cart is really nice, sturdy, secure. A worthy mode of transporting and charging those wonderful iPads. But when you are starting with nothing and penny pinching, that cart is about the equivalent of 5 iPads.
My first stab was a milk crate– hmmm… didn’t roll, 24 iPads were pretty heavy, wasn’t even slightly secure, iPads were exposed to dust and dirt, and the clincher was- how do I charge all this stuff?! In my job role, I am so tired of wires, cables, adapters, cords, chargers, etc. Sometimes networking seems to be more like tangling than connecting!So the essential question was: “Could I innovate and make my own iPad Lab Charging Cart?”
So the next choice was a rolling file cart. I was pleased to find that this particular cart would accommodate nearly 40 iPads in two rows with the charging dock facing up. Here is a step by step to help you build your own iPad Rolling Classroom Lab!
–note that this set of instructions is for a lab that charges, but doesn’t provide the hardware for wired syncing
1) Purchase Vaultz Locking Mobile Wheelie Chest. This link is available for your convenience, but I have seen these at Staples, and Office Depot.
2) Test for iPad Capacity.
Of course, before you start to modify or invest in other parts for this project, it would be good to check and see if your iPads will fit as nicely as mine did. I didn’t purchase an iPad case that added substantial thickness or width to the overall size of each iPad. So try your iPads and see if you will be able to accommodate as many as you need. Ultimately the finished project will position the iPads over the wheels and leave room for the chargers in the front of the box as seen here above left.
Remember, you want to be able to charge these in the cart, so there should be room above the iPad for the charging cables without undo stress.
Black & Decker 71-120 5-Piece Hole S...
Black & Decker
Best Price $8.95
or Buy New $9.02
Privacy Information
3) Use a Hole Saw.
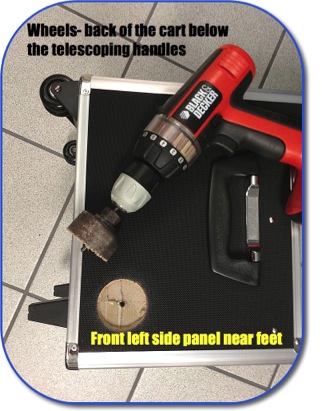
I wanted my iPad Cart to accommodate chargers, cables and a powerstrip to plug the chargers into inside the box, so the teacher could lock the iPads up each night while they were recharging. So I used a hole saw to cut a port in the front left bottom corner of the box. In retrospect I could have used a smaller diameter hole saw, it just needs to be big enough to thread the plug of the power strip through. After all this is set up, I will cover the hole with a square of felt with a slit for the cord to pull through.
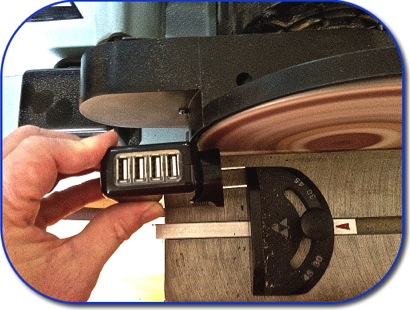
4) Build your Charging Station. Buy 6 USB 4 Port Chargers (for 24 iPads).
I wrestled for a while with finding powerstrips that would allow 6 or 8 Apple iPad Chargers to sit side by side on one powerstrip. I would think that there is something like this out there, but as I was working through this, I realized that it would be hard to fit three of these powerstrips, with their cables and the iPad chargers into the space I was saving for this. So then I begin looking for third party USB charging stations. None of what I found provide the full amperage that a single Apple iPad charger provides, but the one I selected Provides standard USB 5V at up to 2A (max). From experience, this meant that if four iPads were plugged in to one of these, it would take approximately four times as long to charge as if I used the Apple Charger. If school ended at 4 PM and started at 9 AM the following day, there would be more than enough time to get a full charge restored to the iPads (17 hours). I have heard that the new iPad takes a bit longer to charge than iPad 2 and iPad 1. Some background information from––> Gizmodo.
5) You may need to grind down the charger AC adapter.
I found that I needed to remove some of the plastic wings that were apart of the aesthetic design of the chargers.
These wings may also serve to stabilize the charger on the wall or powerstrip, but once my chargers were attached to the powerstrip, that would not be an issue, since they would be so close side by side, they would stabilize each other.
Your powerstrip may not require you to cut these off.
I had access to a grinder, but you may need to use a vice with a sander to do the same job. Careful of the hot plastic, it burns!
6) Assemble the Chargers.
I initially want to have capacity for 24 iPads in my cart. The power strip I chose had 5 outlets, so I put four of the 4 Port USB chargers on that block, then I added a three outlet extension cord to the 5th outlet on the powerstrip. Eventually I could have 28 iPads charging in this cart: (7) 4 Port USB charging blocks.
The 4 port USB Charging Blocks have the option of removing the AC adapter built in and using a Figure 8 AC Adapter cord similar to what is found on VCRs and other household electronics.
7) Hide the Wire Mess Part 1
As I mentioned before, as an educational technologist, wires are necessary, but I often get overwhelmed and frustrated dealing with the spaghetti that is the bane of my existence. I wanted to keep this neat and easy to use for my teachers and students. The next step was to cut a piece of 3/8” plywood so that it fit in and formed a wall between the charging chamber and the iPad chamber.
The plywood fits down below the metal rail that the top of the cart rests in.
I also cut and used wood glue to adhere a 1” X 1” to the bottom of my chamber wall. This will help reinforce (keep from bowing) and stabilize the wall. I will also put velcro on the bottom of it, to help keep the wall in place.
8) Hide the Wire Mess Part 2
Next comes the cover to hide the wires, powerstrip and USB Charging Blocks. Using leftover scrap from the 3/8” plywood, I cut notches in it to pass the USB charging cables through. The slits don’t have to be exact in size or depth, just relatively evenly spread apart. I made enough for 7 charging blocks in case I get as many as (4x7) 28 iPads to populate this case.
I found that a sharp razor knife was the easiest way to cut black felt to cover the two pieces of plywood. You could hot glue the felt, but I found it fast and easy to use a staple gun. I then used scissors to cut slits where the cords would slide through.
Note: It is amazing how nice jury rigged things look once you cover them in black felt.
9) Neatening Everything Up
I started to use wire twist ties to group the four wires so they would not be randomly going everywhere, then I decided to use nylon ties. The nylon ties were much tighter, and provided a cleaner look. I only want enough of the cables to stick through as necessary to reach the iPads.
I used a few more small strips of velcro to hold the top to the side of the divider plywood. Even though the velcro had a pretty strong adhesive, I used the staple gun to secure the felt and velcro to the plywood. Everything was wedged pretty tight so that probably wasn’t necessary, but kind of helped seal things up.
10) Cushion for the Bumpy Sidewalk
Our school is an outdoor school with rather old sidewalks between wings, so I put a couple of sheets of foam under the iPads to provide a little additional cushioning. It probably was not really necessary, but it didn’t cost me anything extra, so why not?
11) Last Step: Velcro the Power Strip Cable
The last thing I did was use a small wood screw to fasten a velcro wrap to the side of the case so that during transport the Power Strip Cable was not dragging around on the ground.
Shopping List (not all items are mandatory)
Vaultz Locking Mobile Wheelie Chest
Two scraps of 3/8” plywood
5 port surge supressor powerstrip
6 Cosmos 4-Port Wall USB Chargers
~24 Small Nylon Ties
24 USB –>iPad Dock Cables
Small Piece of Black Felt (less than a square yard)
Short Extension Cord with three plugs at the end
Figure 8 electrical AC Adapter cord
Foam packing layer
Tools
Scissors
Hole Saw
Razor Knife
Staple Gun
Table, Band, or Circular Saw to cut wood
Sander or Grinder to modify the USB chargers if necessary
I would love to hear from you if you have any comments, corrections, or suggestions. Leave your comments below or send me an email!
Comments
Classroom Response System
Jul 10, 2011 Filed in: Standards-Assessment
As mentioned in previous posts, I primarily focus my energy on multimedia integration in instruction, project-based learning– but I also recognize that a mixed approach to instruction is not only the most realistic for the course instructors, but probably the best for learning outcomes as well.
Furthermore, as I provide training on iPads and iPods in the classroom, I realize that if teachers identify things that they are accustomed to using in an analog world, they may be quicker to try integrating those tasks to a digital world. Standard quiz and test techniques fall into that category.
So with that, I present you with my latest discovery of a fun way to use set’s of iPod Touches, iPads or for schools that are 1:1 with those devices or want to experiment with BYOT (bring your own technology):
eClickers!
After paying dearly (over $1000) for classroom response systems (several times) at my school, the first thing that strikes me about this is the price! For less than $10 (for the host App) on the iPad or iPhone (it is a universal app) – You are in business!
Any internet connected device can respond to quizzes, tests on a webpage, or iOS devices can use a free client App to respond (much more efficient). The teacher can create the standard multiple choice, true false, agree/disagree. You can import diagrams, and even mark up those diagrams in the App. Teachers can share test banks via Bluetooth.
It seems very easy to use in my initial efforts to share it with teachers at workshops– and there are many other features –so rather than repeat what the App store says, go check it out for yourself!
iOS / iPad not 'better' but 'good different'?
Mar 04, 2011 Filed in: Staying Currentblog topics: Technology Integration
Was provoked to dialog in a twitter exchange between Ben Grey, Jon Becker and Dean Shareski regarding Dean’s blog post: Why the iPad is Different
(this is a good blog to read- check it out!)
We lose a bit of perspective when we try and equate iOS devices to laptops and netbooks. iOS devices have taken novel technologies and have opened up one of the first genuinely new ways of interacting with a computer.
After reading various GUI Experts* critiques for years, I have been intrigued with the notion that people were tired of the Desktop/File System/Mouse/Icon ways of interacting with computers. REALLY? So what would this look like? What could be better? The iOS has answered that question for me (sometimes). Maybe not 'better' but at least "good different".
Although iOS doesn't completely change the way everything works (we still have icons and clipboard, etc.), it is a pretty radical departure that makes computing much lighter weight, generally lighter wait, and simpler. Furthermore, accelerometers, gyros, geolocation, multitouch surface, these are integrated and being integrated in ways that are refreshing, novel, and inspiring! Most of us would not have imagined the crazy things that could be done with these technologies if we were limited to a laptop or netbook form factor.
So I believe our students and educators deserve to have access to both experiences and I think that true technology literacy is developed by being aware of the strengths and appropriateness of a variety of tools.
*such as the late Jef Raskin, one of the creators of the original MacOS GUI says "shuttling between a keyboard and a mouse wastes too much time." http://www.businessweek.com/technology/content/jan2003/tc20030122_7027.htm
Technology as an Amplifier-The SciPad Technology as an Amplifier-The SciPad!
Dec 08, 2010 Filed in: Technology Integration
This fits beautifully with my interests as an educational technologist and my background as a science educator/scientist. The definition of technology states in part: the application of scientific knowledge for practical purposes (New Oxford Dictionary) A scientist views technology as taking a scientific principal and making something practical and useful out of it. So Technology amplifies our capabilities and potential. Technology helps us extend our senses to see, hear, feel, and perceive things that our natural senses may not be able to detect and quantify. A microscope amplifies our sight so that we can see what is otherwise invisible. A properly created graph may help us to project and predict future trends, amplifying our understanding and communication.
Technology can also improve the quality of our information by being more exacting. In science we call this quantifiable observations - observations that are quantities based on a standard of measurement. Qualitative observations that we make such as the water is warm or cold become temperatures that are much more meaningful. We are not relying on an ambiguous expression that is relevant only to some unexacting construct in the observer’s mind.
A eighth grade science research student believes that the sound of a boat engine causes stress to aquatic organisms. We find a sound file of the sound of a boat engine, set it to loop as a Quicktime file. This audio file is played through a set of headphones clamped on the outside of the small tanks with 30 Daphnia (a small freshwater crustacean).
Sound is typically measured in decibels (dB) units. Decibels are units of pressure – but sound is also described in terms of frequency... so you could have a lot of sound ‘pressure’ at a low (bass, drum) frequency and have very little pressure at a high (tweeter, cymbal, flute) frequency. So sound is characterized by a combination of frequency (measured in Hz) and pressure (measured in dB).
So we had a hydrophone – a submersible microphone. But we needed a special type of meter that would measure sound, unfortunately I learned at the last minute that our $50 dB Meter from Radioshack was broken. Furthermore, we also looked at the specs and determined that the Radioshack device wouldn’t work to measure sounds below 50 dB, which was likely going to be an issue. Next day delivery on another $200 device from Amazon didn’t mention any external microphone port (for the hydrophone) and there were no reviews .
When Google searches and Amazon next day delivery didn’t work, I turned to the place I increasingly am relying on for novel solutions: The iTunes App Store! Here I found over 20 apps that served as dB meters, the most promising from audio enthusiast and professional sound engineer, Andrew Smith in Boulder, CO and his software company: Studio Six Digital . With a click, a brief download and sync I was in business with an audio testing suite of software that some reviews equated to equipment costing between $4,000 and $6,000!
Our set up included a Belkin microphone that plugged into the base of the iPod Touch (or iPhone). Research on the audio recording capabilities of the iPod Touch’s headphone/microphone input at the top of the device revealed that the Touch has a low frequency filter (probably to prevent wind noise) which was part of what we wanted to measure. The Belkin device has a miniplug (3.5-millimeter), stereo microphone adapter for an external microphone- our hydrophone in this case. This input will bypass the low frequency filter of the headphone/microphone jack at the top of the Touch.
When she was able to measure the sound levels in the tanks, our research found that the tanks that were supposed to have no sound had virtually the same audio characteristics as the tanks that were being treated with sound! It turned out that most of the sound was being conducted through the surface of the desk and since all the tanks were on the same desk surface, they were all being treated with the same sound. Our researcher was going to have to repeat the experiment and isolate the tanks so that the treatment was not transferred through all the tanks.
So end of story:
Technology can also improve the quality of our information by being more exacting. In science we call this quantifiable observations - observations that are quantities based on a standard of measurement. Qualitative observations that we make such as the water is warm or cold become temperatures that are much more meaningful. We are not relying on an ambiguous expression that is relevant only to some unexacting construct in the observer’s mind.
An Example of How Technology Amplifys a Student’s Understanding
A eighth grade science research student believes that the sound of a boat engine causes stress to aquatic organisms. We find a sound file of the sound of a boat engine, set it to loop as a Quicktime file. This audio file is played through a set of headphones clamped on the outside of the small tanks with 30 Daphnia (a small freshwater crustacean).
Technology Amplifies Our Abilities
We create a simple script on her Mac laptop in Automator to play and stop playing the file in iTunes. Then we create an event to run these Automator scripts for 5 days in iCal. On one computer the iCal events allow the looped file to play for 5 hours, On another computer, the motorboat file is set in iCal to run for 12 hours. A third group (the control group), there is no sound being played at all.Technology Amplifies and Quantifies Our Observations
So we have an audio file playing at the same volume out of iTunes on six experimental groups – using six sets headphones. Or do we? How do we know the sound in the different tanks is the same sound? How do we characterize the sound? Is it loud? Medium loud? Primarily highs, lows or midrange tones? To have a clear and common understanding we need to use numbers that are based on a standard of measurement (common meaning so that other people can have a true sense of what the character of the sound is).Sound is typically measured in decibels (dB) units. Decibels are units of pressure – but sound is also described in terms of frequency... so you could have a lot of sound ‘pressure’ at a low (bass, drum) frequency and have very little pressure at a high (tweeter, cymbal, flute) frequency. So sound is characterized by a combination of frequency (measured in Hz) and pressure (measured in dB).
Technology Allows Us To Monitor Things In Unusual Places
Next we needed to monitor what the Daphnia were hearing in the water. It would be silly to stick our head in the water– we probably would introduce a whole new level of stress for these aquatic crustaceans, assuming our head fit. And we wouldn’t be able to quantify (provide number measurement of our observations) if we used only our ears.So we had a hydrophone – a submersible microphone. But we needed a special type of meter that would measure sound, unfortunately I learned at the last minute that our $50 dB Meter from Radioshack was broken. Furthermore, we also looked at the specs and determined that the Radioshack device wouldn’t work to measure sounds below 50 dB, which was likely going to be an issue. Next day delivery on another $200 device from Amazon didn’t mention any external microphone port (for the hydrophone) and there were no reviews .
App Store & iPod Touch to the Rescue
When Google searches and Amazon next day delivery didn’t work, I turned to the place I increasingly am relying on for novel solutions: The iTunes App Store! Here I found over 20 apps that served as dB meters, the most promising from audio enthusiast and professional sound engineer, Andrew Smith in Boulder, CO and his software company: Studio Six Digital . With a click, a brief download and sync I was in business with an audio testing suite of software that some reviews equated to equipment costing between $4,000 and $6,000!
Our set up included a Belkin microphone that plugged into the base of the iPod Touch (or iPhone). Research on the audio recording capabilities of the iPod Touch’s headphone/microphone input at the top of the device revealed that the Touch has a low frequency filter (probably to prevent wind noise) which was part of what we wanted to measure. The Belkin device has a miniplug (3.5-millimeter), stereo microphone adapter for an external microphone- our hydrophone in this case. This input will bypass the low frequency filter of the headphone/microphone jack at the top of the Touch.
When she was able to measure the sound levels in the tanks, our research found that the tanks that were supposed to have no sound had virtually the same audio characteristics as the tanks that were being treated with sound! It turned out that most of the sound was being conducted through the surface of the desk and since all the tanks were on the same desk surface, they were all being treated with the same sound. Our researcher was going to have to repeat the experiment and isolate the tanks so that the treatment was not transferred through all the tanks.
So end of story:
Technology helps us learn. Technology amplifies
what we are capable of.
Ok, maybe I am not an amplifier, but with technology I can help others amplify their knowledge, understanding, senses, communication, and LIFE!New Product or Special Design for ABC News?
Oct 19, 2010 Filed in: Staying Current
I just don’t know what to make of this... I have frequented the ABC News bar for over a decade. AM’s with Good Morning America, World News Tonight in the evening.
More than once I have felt a mixture of disappointment, sympathy and dismay that my news team was equipped with Windows-based technology.
Yeah, I have my preferences and reserved judgements for those who don’t appreciate the Apple-branded product. So I was surprised and keenly curious when I saw the World News Tonight Anchor Diane Sawyer sitting at a modern glass desk with a very clean, austere, lines- no paper clutter, no legal pad, no ugly blockish, cheap ThinkPad, but WHAT?!!! is that an Apple MacBook Air?!!!
In another segment the papers, pencils and legal pad appear, but I can get another glance at that Apple Logo’ed product...
Second look, no, there is a Bluetooth Apple Keyboard and maybe some type of small display? Or is it... some sort of an iPad????!!! Front screen shots confirmed it was an iPad with typical app icons.
Why didn’t I immediately realize it was an iPad? I knew that ABC News was actively promoting its new iPad app. I certainly knew that the iPad app was flashy and has gotten a lot of media attention. But there was a minor detail that other bloggers had not discussed – the device appears to be about the size of an iPad, but it sure looks like it is in it’s landscape orientation, and the famous pome logo was upright!
So is this just case of lens distortion? Is it really vertical? Fascinating question of optics. Maybe part of the illusion is because it appears to be held by a Element Case Joule iPad Stand. A paltry $129 statement of good taste and design.
A Bummer of A Day
May 09, 2010 Filed in: Personal Reflections
Yesterday was a Sad-Man-Shupe day...
After synagogue services, we broke our usual routine of rest and relaxation for the Shabbat in order to perform a good deed. A Zionist Christian friend had been holding a garage sale to raise money for some humanitarian work in Central America. We have helped her before by moving the stuff that didn’t sell over to another local mission that does homeless and alcohol rehab work for sale in their thrift shop.
It is already pretty hot and the thrift shop was only a couple miles away, but closing early. I agreed to make one run in our van while the gals organized and boxed up the second load. My wife notice her Torah bag with her dance shoes and other stuff was up against the back of passenger’s side front seat and started to move it, but I told her we could leave it in there, I would just watch and make sure it was not unloaded at the thrift store. I was concerned that if we took it out, (along with my bag), everything would shift and fall.
So when I got to the thrift store, there was only one young man there to help unload and he said they were just about to close up. I panicked and when into high gear to help him unload. In the heat and pressure of quickly unloading I forgot about our personal stuff until we had gotten most everything out of the van. And I had been unloading the opposite side of the van thinking (foolishly) about saving some ink cartridges which we recycle for a school fundraiser.
Now one would have thought that a high end black computer bag would not be included in a set of mismatched kitchen items, worn out Little Tyke kitchen toys, and shabby clothing. But one also would have expected a person who values and cares for technology would have had better sense that to leave it in the back of a van transporting garage sale rejects.
So after emptying the van, I noticed my bag missing and retrieved it and a broken iPad, the screen shattered. I was really quite upset, uttering a naughty word, which those who know will attest, I seldom do.
Amazingly, it still works!
(Albeit not with such astonishing beauty and splendor.)
It didn’t even occur to me to try it. I brought it home beset in somewhat of a funk... my son’s friend (who hadn’t seen it yet) saw me come in the door and immediately asked if he could see it. He didn’t know it was broken, but was just an Apple iPhone/Macbook user and and wanted to try out the new product.
I showed him and he immediately turned it on! Yikes!!!
The Fix...
I actually haven’t made the final decision yet, but found rather quickly that I can have Apple replace it for $269 (I bought the $499 model) or send it to a third party service company for $199.