Norwegian School Places Parents Under the Tutelage of Educators

The school has a new task, namely to educate parents
Even though this article reports on education in Norway, we have seen similar policies in the good old U.S. of A. We have often said that student success has a high correlation with stable, healthy home environments and supportive, educated parents. So the big question is can (or should) teachers be held responsible or accountable for parent learning or educational involvement?
The Denmark regulation states: The school and now will: facilitate cooperation with the home and ensure that parents / guardians share responsibility in schools. Good teachers should already be doing that. The concern is when it becomes law and must be documented, assessed and enforced.
FETC Take Aways - First Edition - The T-Shirt Discovery

So when I am at a conference, watching for interesting t-shirts is a part of the experience. Read More...
Mobile iPad Lab on the Cheap: DYI Charging Cart

Our district is in the throws of “Racing to the Top” and at the same time we are still under severe budget constrictions. Every technology dollar budgeted is directed towards ‘Testing Computers’. Meanwhile, my dream and educational vision is to increase student use of the technology for problem solving, creativity, communication, collaboration, and amplifying their understanding. The challenge is doing more with less.
I fundraised, scrimped, saved and advocated for the purchase of a ‘Class Set of iPads’ at my school and even though the iPads themselves are about half the cost of laptops or desktop computers, there are still those additional costs for a full set of apps, protective covers, and then the big one: a charging cart for moving the iPad lab from classroom to classroom. The Bretford Charging Cart is really nice, sturdy, secure. A worthy mode of transporting and charging those wonderful iPads. But when you are starting with nothing and penny pinching, that cart is about the equivalent of 5 iPads.
My first stab was a milk crate– hmmm… didn’t roll, 24 iPads were pretty heavy, wasn’t even slightly secure, iPads were exposed to dust and dirt, and the clincher was- how do I charge all this stuff?! In my job role, I am so tired of wires, cables, adapters, cords, chargers, etc. Sometimes networking seems to be more like tangling than connecting!So the essential question was: “Could I innovate and make my own iPad Lab Charging Cart?”
So the next choice was a rolling file cart. I was pleased to find that this particular cart would accommodate nearly 40 iPads in two rows with the charging dock facing up. Here is a step by step to help you build your own iPad Rolling Classroom Lab!
–note that this set of instructions is for a lab that charges, but doesn’t provide the hardware for wired syncing
1) Purchase Vaultz Locking Mobile Wheelie Chest. This link is available for your convenience, but I have seen these at Staples, and Office Depot.
2) Test for iPad Capacity.
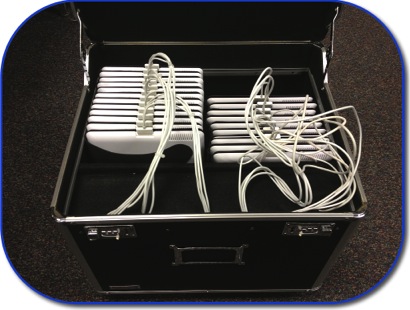
Of course, before you start to modify or invest in other parts for this project, it would be good to check and see if your iPads will fit as nicely as mine did. I didn’t purchase an iPad case that added substantial thickness or width to the overall size of each iPad. So try your iPads and see if you will be able to accommodate as many as you need. Ultimately the finished project will position the iPads over the wheels and leave room for the chargers in the front of the box as seen here above left.
Remember, you want to be able to charge these in the cart, so there should be room above the iPad for the charging cables without undo stress.
Black & Decker 71-120 5-Piece Hole S...
Black & Decker
Best Price $8.95
or Buy New $9.02
Privacy Information
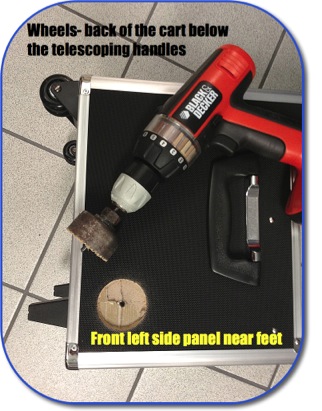
3) Use a Hole Saw.
I wanted my iPad Cart to accommodate chargers, cables and a powerstrip to plug the chargers into inside the box, so the teacher could lock the iPads up each night while they were recharging. So I used a hole saw to cut a port in the front left bottom corner of the box. In retrospect I could have used a smaller diameter hole saw, it just needs to be big enough to thread the plug of the power strip through. After all this is set up, I will cover the hole with a square of felt with a slit for the cord to pull through.

4) Build your Charging Station. Buy 6 USB 4 Port Chargers (for 24 iPads).
I wrestled for a while with finding powerstrips that would allow 6 or 8 Apple iPad Chargers to sit side by side on one powerstrip. I would think that there is something like this out there, but as I was working through this, I realized that it would be hard to fit three of these powerstrips, with their cables and the iPad chargers into the space I was saving for this. So then I begin looking for third party USB charging stations. None of what I found provide the full amperage that a single Apple iPad charger provides, but the one I selected Provides standard USB 5V at up to 2A (max). From experience, this meant that if four iPads were plugged in to one of these, it would take approximately four times as long to charge as if I used the Apple Charger. If school ended at 4 PM and started at 9 AM the following day, there would be more than enough time to get a full charge restored to the iPads (17 hours). I have heard that the new iPad takes a bit longer to charge than iPad 2 and iPad 1. Some background information from––> Gizmodo.

I found that I needed to remove some of the plastic wings that were apart of the aesthetic design of the chargers.
These wings may also serve to stabilize the charger on the wall or powerstrip, but once my chargers were attached to the powerstrip, that would not be an issue, since they would be so close side by side, they would stabilize each other.
Your powerstrip may not require you to cut these off.
I had access to a grinder, but you may need to use a vice with a sander to do the same job. Careful of the hot plastic, it burns!

I initially want to have capacity for 24 iPads in my cart. The power strip I chose had 5 outlets, so I put four of the 4 Port USB chargers on that block, then I added a three outlet extension cord to the 5th outlet on the powerstrip. Eventually I could have 28 iPads charging in this cart: (7) 4 Port USB charging blocks.

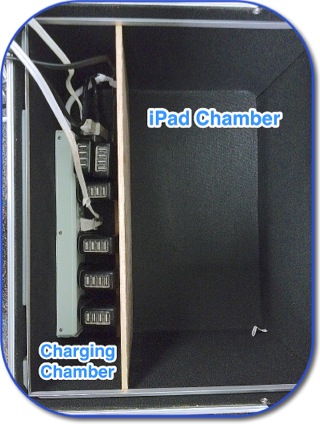
As I mentioned before, as an educational technologist, wires are necessary, but I often get overwhelmed and frustrated dealing with the spaghetti that is the bane of my existence. I wanted to keep this neat and easy to use for my teachers and students. The next step was to cut a piece of 3/8” plywood so that it fit in and formed a wall between the charging chamber and the iPad chamber.
The plywood fits down below the metal rail that the top of the cart rests in.
I also cut and used wood glue to adhere a 1” X 1” to the bottom of my chamber wall. This will help reinforce (keep from bowing) and stabilize the wall. I will also put velcro on the bottom of it, to help keep the wall in place.

Next comes the cover to hide the wires, powerstrip and USB Charging Blocks. Using leftover scrap from the 3/8” plywood, I cut notches in it to pass the USB charging cables through. The slits don’t have to be exact in size or depth, just relatively evenly spread apart. I made enough for 7 charging blocks in case I get as many as (4x7) 28 iPads to populate this case.
I found that a sharp razor knife was the easiest way to cut black felt to cover the two pieces of plywood. You could hot glue the felt, but I found it fast and easy to use a staple gun. I then used scissors to cut slits where the cords would slide through.
Note: It is amazing how nice jury rigged things look once you cover them in black felt.

9) Neatening Everything Up
I started to use wire twist ties to group the four wires so they would not be randomly going everywhere, then I decided to use nylon ties. The nylon ties were much tighter, and provided a cleaner look. I only want enough of the cables to stick through as necessary to reach the iPads.
I used a few more small strips of velcro to hold the top to the side of the divider plywood. Even though the velcro had a pretty strong adhesive, I used the staple gun to secure the felt and velcro to the plywood. Everything was wedged pretty tight so that probably wasn’t necessary, but kind of helped seal things up.
 10) Cushion for the Bumpy Sidewalk
Our school is an outdoor school with rather old sidewalks between wings, so I put a couple of sheets of foam under the iPads to provide a little additional cushioning. It probably was not really necessary, but it didn’t cost me anything extra, so why not?
11) Last Step: Velcro the Power Strip Cable
The last thing I did was use a small wood screw to fasten a velcro wrap to the side of the case so that during transport the Power Strip Cable was not dragging around on the ground.
Shopping List (not all items are mandatory)
Vaultz Locking Mobile Wheelie Chest
Two scraps of 3/8” plywood
5 port surge supressor powerstrip
6 Cosmos 4-Port Wall USB Chargers
~24 Small Nylon Ties
24 USB –>iPad Dock Cables
Small Piece of Black Felt (less than a square yard)
Short Extension Cord with three plugs at the end
Figure 8 electrical AC Adapter cord
Foam packing layer
Tools
Scissors
Hole Saw
Razor Knife
Staple Gun
Table, Band, or Circular Saw to cut wood
Sander or Grinder to modify the USB chargers if necessary
I would love to hear from you if you have any comments, corrections, or suggestions. Leave your comments below or send me an email!